Guide to setup React Router V7 like a Pro
Setup Project
Tutorial นี้จะ setup project โดยใช้ React router version 7 นะครับ เราจะใช้งานแบบ framework เพื่อจะเอาไปใช้งานแบบ Server side rendering
ใช้คู่กับ Shadcn + Tailwind v4 นะครับ
และผมจะใส่ Husky + Gitmoji + lint-staged ด้วย
ผมรอที่จะใช้ TanStack Start อยู่ ระหว่างนี้มันยังเป็น Beta อยู่ก็เลยจะใช้ React Router V7 ในโปรเจคปัจจุบันไปก่อน
ในอนาคตเมื่อ TanStack Start พร้อมใช้จากใน production ผมจะมาเขียนวิธี setup แบบนี้ให้อีกครั้งหนึ่งครับ
มาเริ่มกันเลย
Install React Router V7 Framework
ผมจะใช้ pnpm นะครับ ใช้คำสั่งนี้
pnpm dlx create-react-router@latest my-react-router-appจากนั้นผมจะเลือกตัวเลือกแบบนี้
         create-react-router v7.1.5      ◼  Directory: Using my-react-router-app as project directory
      ◼  Using default template See https://github.com/remix-run/react-router-templates for more      ✔  Template copied
   git   Initialize a new git repository?         Yes
  deps   Install dependencies with pnpm?         Yes
      ✔  Dependencies installed
      ✔  Git initialized
  done   That's it!
         Enter your project directory using cd ./my-react-router-app         Check out README.md for development and deploy instructions.
         Join the community at https://rmx.as/discord
จากนั้นก็ cd เข้าไปที่ folder
cd my-react-router-appจะมีโครงสร้าง folder แบบนี้
├── app│ ├── app.css│ ├── root.tsx│ ├── routes│ ├── routes.ts│ └── welcome├── Dockerfile├── package.json├── pnpm-lock.yaml├── public│ └── favicon.ico├── react-router.config.ts├── README.md├── tsconfig.json└── vite.config.tsเขาใส่ Dockerfile มาให้ด้วยนะ
pages ต่างๆจะสร้างที่ folder /routes นะ
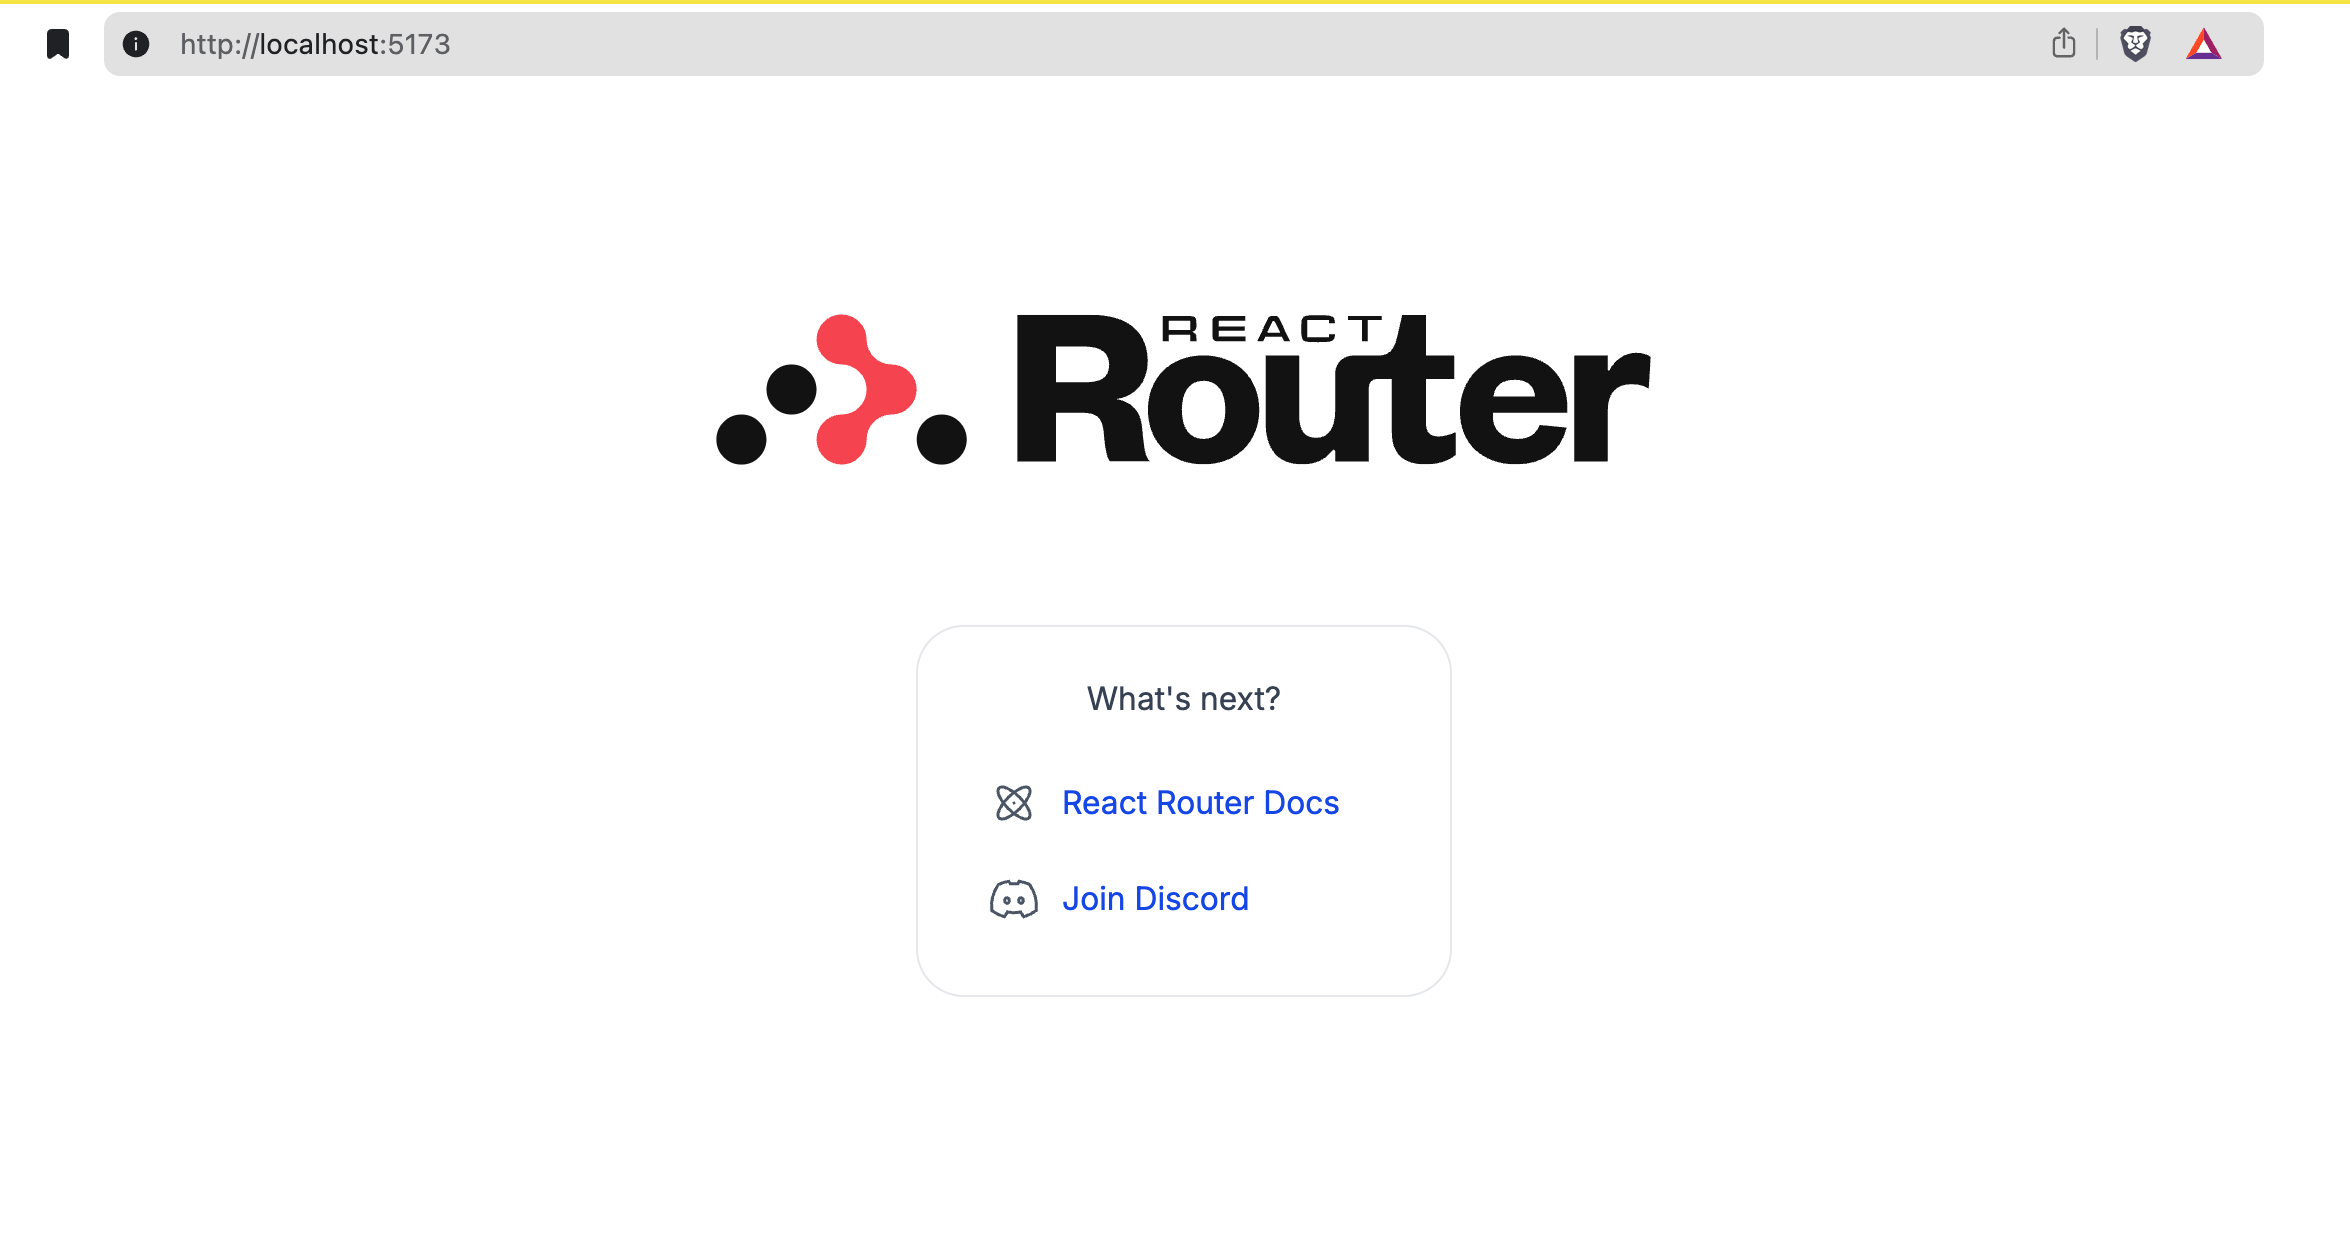
แล้วลองรันดูก่อนเลย
pnpm devจะได้แบบนี้
Setup File-based routing using Flat Routes
เนื่องจากว่า setup เริ่มต้นของ React Router V7 จะใช้วิธีเขียน Routes เองในไฟล์ routes.ts
เวลาเราอยากสร้าง Routes ใหม่เราก็จะต้องมา setup ที่ไฟล์นี้แหละ
├── app│ ├── app.css│ ├── root.tsx│ ├── routes│ ├── routes.ts│ └── welcomeตัวอย่าง
app/routes.ts
import { type RouteConfig, route, index, layout, prefix,} from "@react-router/dev/routes";
export default [ index("./home.tsx"), route("about", "./about.tsx"),
layout("./auth/layout.tsx", [ route("login", "./auth/login.tsx"), route("register", "./auth/register.tsx"), ]),
...prefix("concerts", [ index("./concerts/home.tsx"), route(":city", "./concerts/city.tsx"), route("trending", "./concerts/trending.tsx"), ]),] satisfies RouteConfig;แต่ผมอยากได้แบบ File-based routing คือใช้ชื่อไฟล์แทนชื่อ Routes ไปเลย
เราจะเรียกมันว่า FlatRoutes
ใน React Router V7 สามารถทำได้อยู่แล้ว(ใช้ท่าเดียวกัน Remix) แต่เขาไม่ได้ใส่มาให้ตอนเริ่มต้น
ซึ่งส่วนนี้เราต้องมา setup เอง
เริ่มที่ install packages ตามนี้
pnpm add @react-router/fs-routesapp/routes.ts
import { type RouteConfig } from "@react-router/dev/routes";import { flatRoutes } from "@react-router/fs-routes";
export default flatRoutes({ rootDirectory: "pages",}) satisfies RouteConfig;โค้ดด้านบนเราบอกว่าใช้ ชื่อไฟล์เป็นชื่อ Routes ได้เลย โดยให้ไปดูที่ folder /pages
ผมก็จะสร้าง folder pages ขึ้นมา
แล้วย้ายไฟล์ home.tsx มาไว้ใน folder /pages จากนั้นก็แก้ชื่อไฟล์ home.tsx ที่พึ่งจะย้ายมา ให้เป็นชื่อ _index.tsx
folder /routes ก็ลบทิ้งไปได้เลย
.├── app│ ├── app.css│ ├── pages│ │ └── _index.tsx│ ├── root.tsx│ ├── routes│ │ └── home.tsx│ ├── routes.tstsconfig.json
ในการ import file ต่างๆ ตัว Framework เขาใส่ alias มาให้แล้ว โดยจะใช้ ~ เป็นตัวแทน folder app แต่ผมอยากใช้ @ แทนเพื่อให้สอดคล้องกับ Shadcn
ผมก็จะแก้ tsconfig ให้เป็นแบบนี้
tsconfig.json
{ "include": [ "**/*", "**/.server/**/*", "**/.client/**/*", ".react-router/types/**/*" ], "compilerOptions": { "lib": [ "DOM", "DOM.Iterable", "ES2022" ], "types": [ "node", "vite/client" ], "target": "ES2022", "module": "ES2022", "moduleResolution": "bundler", "jsx": "react-jsx", "rootDirs": [ ".", "./.react-router/types" ], "baseUrl": ".", "paths": { "~/*": [ "./app/*" ], "@/*": [ "./app/*" ] }, "esModuleInterop": true, "verbatimModuleSyntax": true, "noEmit": true, "resolveJsonModule": true, "skipLibCheck": true, "strict": true }}ตอน import ก็จะใช้ @ แบบนี้
import type { Route } from "./+types/home";import { Welcome } from "@/welcome/welcome";
export function meta({ }: Route.MetaArgs) { return [ { title: "New React Router App" }, { name: "description", content: "Welcome to React Router!" }, ];}
export default function Home() { return <Welcome />;}Setup Shadcn
shadcn
ติดตั้ง tailwind v4 จริงๆ React Router เขาใส่ tailwindcss มาให้เลย
เนื่องจากว่าตอนที่ผมเขียน blog วันนี้ shadcn ยังไม่ได้ support tailwindcss v4 ยังมี issues อยู่
การติดตั้ง shadcn ด้วยคำสั่ง init จะยังใช้ไม่ได้ เราจะมาติดตั้งแบบ manual กัน
ติดตั้ง shadcn ด้วยคำสั่ง
pnpm add tailwindcss-animate class-variance-authority clsx tailwind-merge lucide-reactconfirm หน่อยนะว่าเรา set alias ใน tsconfig.json ให้ใช้ @ แล้ว
แบบนี้
{ "compilerOptions": { "baseUrl": ".", "paths": { "@/*": ["./*"] } }}tailwindcss
จากนั้นก็ไปสร้าง tailwind config file แบบนี้
tailwind v4 ยังสามารถใช้ config file แบบเดิมคู่กันไปกับ config ใน css ได้นะ
.├── app├── components.json├── Dockerfile├── package.json├── pnpm-lock.yaml├── public├── react-router.config.ts├── README.md├── tailwind.config.ts├── tsconfig.json└── vite.config.tstailwind.config.ts
import { type Config } from "tailwindcss"import tailwindcssAnimate from "tailwindcss-animate"
export default { darkMode: "class", content: ["app/**/*.{ts,tsx}", "components/**/*.{ts,tsx}"], theme: { extend: { colors: { border: "hsl(var(--border))", input: "hsl(var(--input))", ring: "hsl(var(--ring))", background: "hsl(var(--background))", foreground: "hsl(var(--foreground))", primary: { DEFAULT: "hsl(var(--primary))", foreground: "hsl(var(--primary-foreground))", }, secondary: { DEFAULT: "hsl(var(--secondary))", foreground: "hsl(var(--secondary-foreground))", }, destructive: { DEFAULT: "hsl(var(--destructive))", foreground: "hsl(var(--destructive-foreground))", }, muted: { DEFAULT: "hsl(var(--muted))", foreground: "hsl(var(--muted-foreground))", }, accent: { DEFAULT: "hsl(var(--accent))", foreground: "hsl(var(--accent-foreground))", }, popover: { DEFAULT: "hsl(var(--popover))", foreground: "hsl(var(--popover-foreground))", }, card: { DEFAULT: "hsl(var(--card))", foreground: "hsl(var(--card-foreground))", }, }, borderRadius: { lg: `var(--radius)`, md: `calc(var(--radius) - 2px)`, sm: "calc(var(--radius) - 4px)", }, }, }, plugins: [tailwindcssAnimate],} satisfies Configapp.css
จากนั้นก็แก้ app.css
.├── app│ ├── app.css│ ├── components│ ├── lib│ ├── pages│ ├── root.tsx│ ├── routes.ts│ └── welcomeapp/app.css
@import "tailwindcss";
@config "../tailwind.config.ts";
@layer base { :root { --background: 0 0% 100%; --foreground: 222.2 47.4% 11.2%; --muted: 210 40% 96.1%; --muted-foreground: 215.4 16.3% 46.9%; --popover: 0 0% 100%; --popover-foreground: 222.2 47.4% 11.2%; --border: 214.3 31.8% 91.4%; --input: 214.3 31.8% 91.4%; --card: 0 0% 100%; --card-foreground: 222.2 47.4% 11.2%; --primary: 222.2 47.4% 11.2%; --primary-foreground: 210 40% 98%; --secondary: 210 40% 96.1%; --secondary-foreground: 222.2 47.4% 11.2%; --accent: 210 40% 96.1%; --accent-foreground: 222.2 47.4% 11.2%; --destructive: 0 100% 50%; --destructive-foreground: 210 40% 98%; --ring: 215 20.2% 65.1%; --radius: 0.5rem; }
.dark { --background: 224 71% 4%; --foreground: 213 31% 91%; --muted: 223 47% 11%; --muted-foreground: 215.4 16.3% 56.9%; --accent: 216 34% 17%; --accent-foreground: 210 40% 98%; --popover: 224 71% 4%; --popover-foreground: 215 20.2% 65.1%; --border: 216 34% 17%; --input: 216 34% 17%; --card: 224 71% 4%; --card-foreground: 213 31% 91%; --primary: 210 40% 98%; --primary-foreground: 222.2 47.4% 1.2%; --secondary: 222.2 47.4% 11.2%; --secondary-foreground: 210 40% 98%; --destructive: 0 63% 31%; --destructive-foreground: 210 40% 98%; --ring: 216 34% 17%; }}
@layer base { * { @apply border-border; } body { @apply font-sans antialiased bg-background text-foreground; }}shadcn utils
เราจะต้องสร้าง utils functions เองแบบนี้
.├── app│ ├── app.css│ ├── lib│ │ └── utils.ts│ ├── pages│ ├── root.tsx│ ├── routes.ts│ └── welcomeapp/lib/utils.ts
import { clsx, type ClassValue } from "clsx"import { twMerge } from "tailwind-merge"
export function cn(...inputs: ClassValue[]) { return twMerge(clsx(inputs))}components.json
ใน shadcn ต้องการ config file สำหรับ shadcn ที่ชื่อว่า components.json
เราก็ต้องสร้าง file นี้ด้วย
.├── app├── components.json├── Dockerfile├── package.json├── pnpm-lock.yaml├── public├── react-router.config.ts├── README.md├── tailwind.config.ts├── tsconfig.json└── vite.config.tscomponents.json
{ "$schema": "https://ui.shadcn.com/schema.json", "style": "new-york", "rsc": false, "tsx": true, "tailwind": { "config": "tailwind.config.ts", "css": "app/app.css", "baseColor": "zinc", "cssVariables": true, "prefix": "" }, "aliases": { "components": "@/components", "utils": "@/lib/utils", "ui": "@/components/ui", "lib": "@/lib", "hooks": "@/hooks" }, "iconLibrary": "lucide"}ลอง add Shadcn’s Button component
pnpm dlx shadcn@latest add buttonจะเห็นว่ามี file ui/button เพิ่มมาละ
.
├── app│ ├── app.css│ ├── components│ │ └── ui│ │ └── button.tsx│ ├── lib│ ├── pages│ ├── root.tsx│ ├── routes.ts│ └── welcomeลองเรียกใช้ที่ _index.tsx
app/pages/_index.tsx
import type { Route } from "./+types/home";import { Welcome } from "@/welcome/welcome";import { Button } from "~/components/ui/button";
export function meta({ }: Route.MetaArgs) { return [ { title: "New React Router App" }, { name: "description", content: "Welcome to React Router!" }, ];}
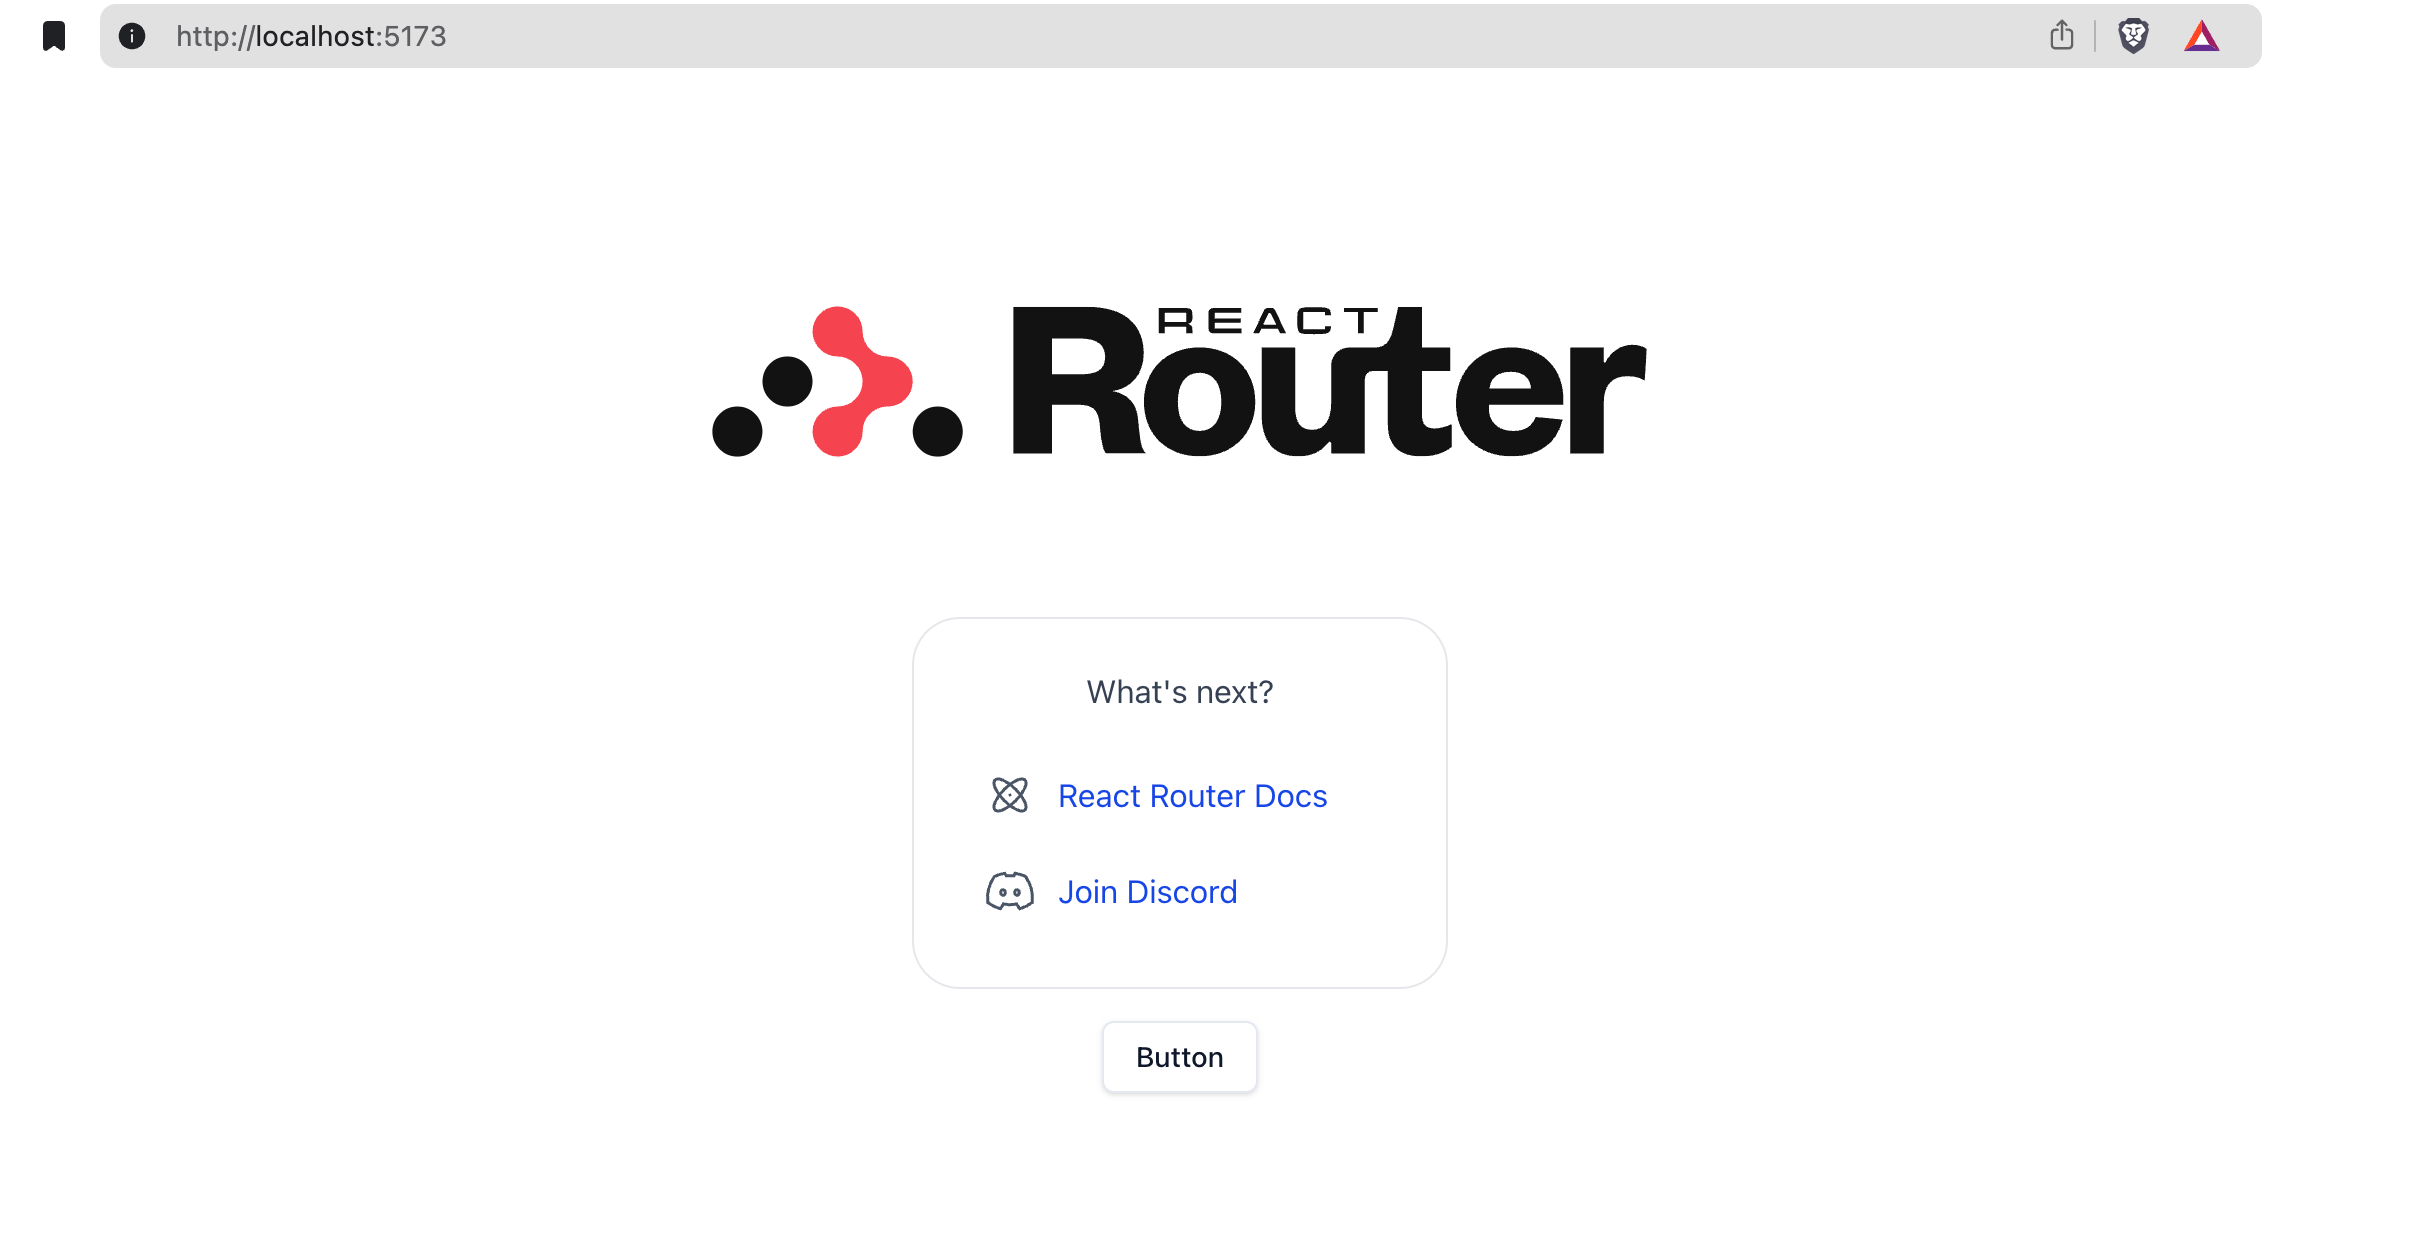
export default function Home() { return <div className="flex flex-col items-center"> <Welcome /> <Button variant="outline">Button</Button> </div>}จะได้แบบนี้ จะเห็นว่าใช้งานได้แล้ว
Setup Eslint
เราจะใส่ eslint ด้วย
ในที่นี้เราจะใช้ eslint ของคุณ Antony Fu
pnpm dlx @antfu/eslint-config@latest┌ @antfu/eslint-config v4.1.1│◇ There are uncommitted changes in the current repository, are you sure to continue?│ Yes│◆ Select a framework:│ ◻ Vue│ ◼ React│ ◻ Svelte│ ◻ Astro│ ◻ Solid│ ◻ Slidev◆ Select a extra utils:│ ◼ Formatter (Use external formatters (Prettier and/or dprint) to format files that ESLint cannot handle yet (.css, .html, etc))│ ◻ UnoCSS└◆ Update .vscode/settings.json for better VS Code experience?│ ● Yes / ○ No└เราจะใช้ plugin perfectionist ด้วย ก็ install ไปเลยแบบนี้
pnpm add -D eslint-plugin-perfectionistมาแก้ไฟล์ eslint.config.js
ผมมี rules ที่ใช้ประจำด้วย ก็จะเพิ่มไปตรงนี้เลยนะ
eslint.config.js
import antfu from "@antfu/eslint-config"import perfectionist from "eslint-plugin-perfectionist"
export default antfu( { formatters: true, react: true, stylistic: { indent: 2, quotes: "double", }, typescript: true, }, { plugins: [ perfectionist.configs["recommended-alphabetical"], ], rules: { "no-console": "warn", "perfectionist/sort-objects": "error", "ts/consistent-type-definitions": "off", "unicorn/throw-new-error": "off", "unused-imports/no-unused-imports": "error", }, }, { ignores: [ "build", "**/*.json", ".husky/install.mjs", ], },)แล้วก็ใส่ script สำหรับคำสั่ง eslint
pnpm pkg set \'scripts.lint:fix=eslint --fix .' \'scripts.lint=eslint .'ที่ package.json จะต้องมี script เพิ่มมาแบบนี้
package.json
"scripts": { "build": "react-router build", "dev": "react-router dev", "start": "react-router-serve ./build/server/index.js", "typecheck": "react-router typegen && tsc", "lint:fix": "eslint --fix .", "lint": "eslint ." },add Type-safe ENV
เราจะใส่ type ให้กับ env ด้วย
เวลาจะใช้งานจะได้มี autocomplete พร้อมกับ type-safe
เนื่องจากว่าเราใช้ Server side rnedering ทุกๆ page ของเราจะเกิดการ render ใหม่ตลอด
เราก็เลยจะใช้ env จาก process.env แทนที่จะเป็น import.meta.env
การ setup type ให้ env ก็จะทำแบบนี้
สร้างไฟล์ global.d.ts ไว้ใน root dir
global.d.ts
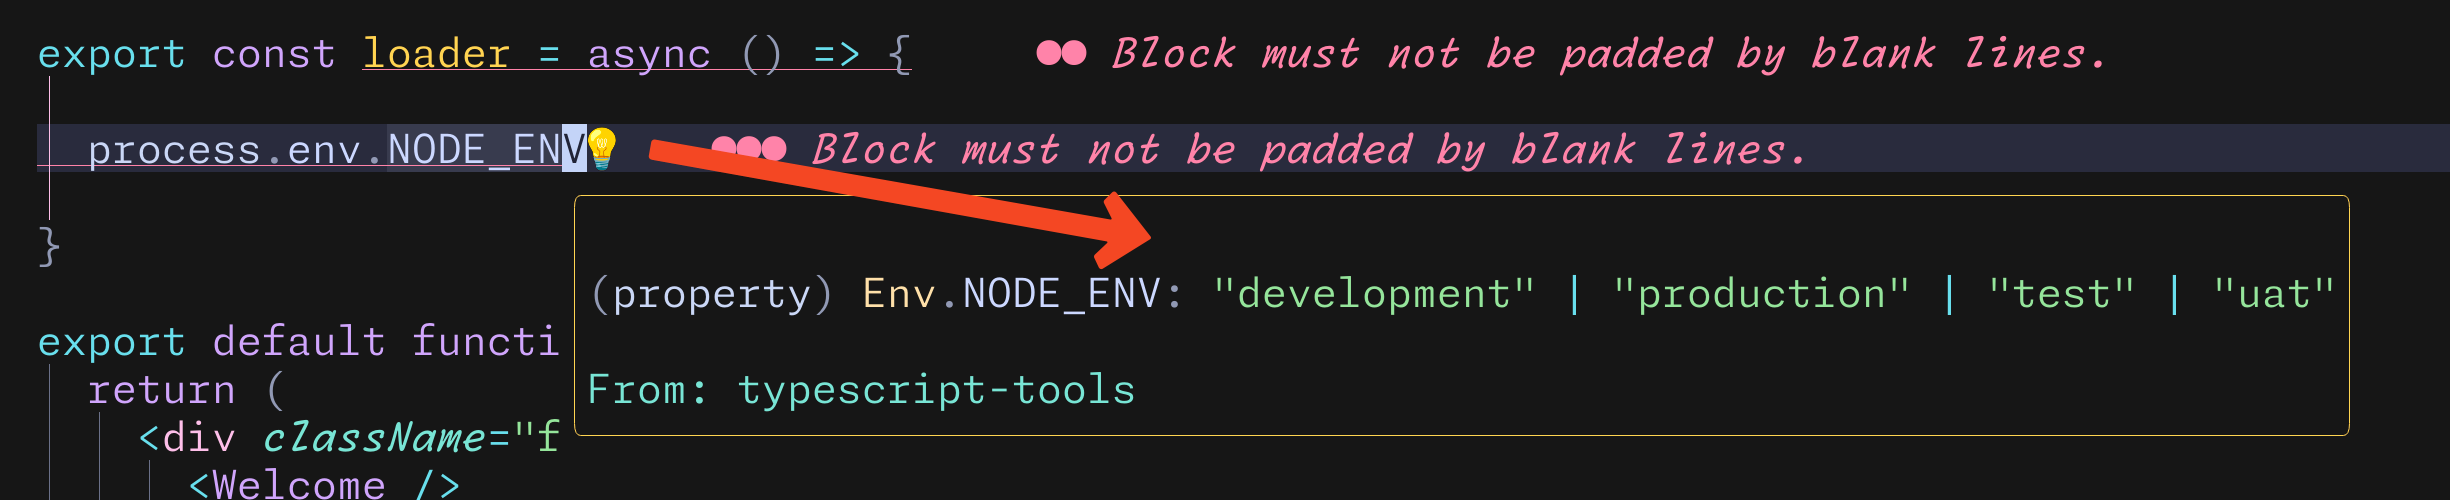
interface Env { NODE_ENV: "development" | "production" | "test" | "uat" /* ... add other env variables here ... */}
declare global { namespace NodeJS { interface ProcessEnv extends Env { } }}
export { }export type IEnv = Envตอนใช้ก็จะมี autocomplete พร้อมกับบอก type แบบนี้
Setup dotenvx
ผมจะใช้ lib dotenvx ด้วย
dotenv จะทำหน้าที่ encrypt ไฟล์ .env ให้
หลักการคือ มันจะสร้าง private-key กับ public-key มา แล้วทำการ encrypt & decrypt ด้วย keys pair นั้นๆ
ถ้าเกิดว่าไม่มี private-key เราจะไม่สามารถ decrypt ได้เลย ใช้วิธีเดียวกันกับ Bitcoin เลย
ตรงนี้ทำให้ผมเอาไฟล์ .env ขึ้น github ได้ด้วย แต่ผมจะไม่เอาไฟล์ .env.keys ขึ้น github ไปด้วย
ข้อดีของการทำแบบนี้คือ เวลาเราทำงานกับเพื่อนๆในทีม เราก็จะไม่ต้อง ส่ง .env ให้เพื่อนเลย มันอยู่ใน git repo อยู่แล้ว เราแค่ ส่ง .env.keys ไปอย่างเดียว
ในอนาคตถ้ามี config เพิ่มใน .env เราก็เพิ่มได้เลย ไม่ต้องบอกเพื่อนว่า เฮ้ย เราพึ่งเพิ่ม config ใน .env ส่งให้แล้วตรงนั้นตรงนี้
แต่ก็มีข้อเสียอยู่คือ ถ้าเกิดเพื่อนในทีมลืม encrypt ก่อน push ทำให้คนที่เข้าถึง private repo ได้ เห็นเลยว่า .env มีอะไรบ้าง
ผมก็จะแก้ปัญหาด้วยการให้ git-hook คอย encrypt ให้ในตอน commit code แต่ก็ไม่ได้แก้ขาดจริงๆ เพราะว่ายัง bypass ด้วยการใส่ HUSKY=0 ก่อนสั่ง commit code ได้อยู่
ถ้าจะให้ดีกว่านี้ก็ต้องไปใช้ tools อื่นเช่น infisical
pnpm add @dotenvx/dotenvxผมจะมี 3 environment servers อันนี้แล้วแต่โปรเจคนะ
ก็เลยจะสร้าง .env ไว้สำหรับทั้ง 3 environment servers
touch .env && \touch .env.uat && \touch .env.prodแล้วก็ใส่ script เพื่อให้ใช้งานได้ง่ายๆ
pnpm pkg set \'scripts.dotenvx=dotenvx' \'scripts.env:dev:dc=dotenvx decrypt' \'scripts.env:dev:ec=dotenvx encrypt' \'scripts.dotenvx:build=dotenvx run -- sh -c \'pnpm build\'' \'scripts.dotenvx:example=pnpm env:dev:dc && pnpm run dev' \'scripts.env:uat:ec=dotenvx encrypt -f .env.uat' \'scripts.env:uat:dc=dotenvx decrypt -f .env.uat' \'scripts.env:prod:ec=dotenvx encrypt -f .env.prod' \'scripts.env:prod:dc=dotenvx decrypt -f .env.prod' \'scripts.env:all:dc=pnpm env:dev:dc && pnpm env:uat:dc && pnpm env:prod:dc' \'scripts.env:all:ec=pnpm env:dev:ec && pnpm env:uat:ec && pnpm env:prod:ec' \'scripts.dotenvx:dev=dotenvx run -- pnpm dev' \'scripts.start=node dist/index.cjs' \'scripts.dotenvx:start=dotenvx run -- pnpm start' \'scripts.dotenvx:start:uat=dotenvx run -f .env.uat -- pnpm start' \'scripts.dotenvx:start:prod=dotenvx run -f .env.prod -- pnpm start' \'scripts.start:example=pnpm dotenvx run -f .env.prod -- sh -c \'react-router-serve ./build/server/index.js\''จะได้ scripts มาแบบนี้
package.json
"scripts": { "build": "react-router build", "dev": "react-router dev", "start": "node dist/index.cjs", "typecheck": "react-router typegen && tsc", "lint:fix": "eslint --fix .", "lint": "eslint .", "dotenvx": "dotenvx", "env:dev:dc": "dotenvx decrypt", "env:dev:ec": "dotenvx encrypt", "dotenvx:build": "dotenvx run -- sh -c 'pnpm build'", "dotenvx:example": "pnpm env:dev:dc && pnpm run dev", "env:uat:ec": "dotenvx encrypt -f .env.uat", "env:uat:dc": "dotenvx decrypt -f .env.uat", "env:prod:ec": "dotenvx encrypt -f .env.prod", "env:prod:dc": "dotenvx decrypt -f .env.prod", "env:all:dc": "pnpm env:dev:dc && pnpm env:uat:dc && pnpm env:prod:dc", "env:all:ec": "pnpm env:dev:ec && pnpm env:uat:ec && pnpm env:prod:ec", "dotenvx:dev": "dotenvx run -- pnpm dev", "dotenvx:start": "dotenvx run -- pnpm start", "dotenvx:start:uat": "dotenvx run -f .env.uat -- pnpm start", "dotenvx:start:prod": "dotenvx run -f .env.prod -- pnpm start", "start:example": "pnpm dotenvx run -f .env.prod -- sh -c 'react-router-serve ./build/server/index.js'" },Husky + Gitmoji + Lint-staged
Husky
ผมจะใช้ husky ทำ githook นะครับ
จริงๆชอบ Lefthook มากกว่า แต่ว่าเพื่อนในทีมบางคนใช้ window แล้วบางทีมันไม่ทำงาน ผมไม่รู้ว่าแก้ยังไง ก็เลยรอเพื่อนในทีมเลิกชอบ Window (ไม่น่าจะมีวันนั้น ฮ่าๆ)
pnpm add --save-dev husky && pnpm exec husky initคำสั่งด้านบน husky จะไปสร้าง folder .husky/ ให้เรา setup ให้เรียบร้อย
แต่ผมอยาก custom เองด้วย
ผมไม่ได้อยากติดตั้ง husky ใน production หรือใน CI
ซึ่งจะใส่ env HUSKY=0 ก็ได้แหละ
แต่ผมอยากใช้ script อะ
สร้างไฟล์ install.mjs ใน folder .husky
.husky├── install.mjs└── pre-commit.husky/install.mjs
// Skip Husky install in production and CIif (process.env.NODE_ENV === 'production' || process.env.CI === 'true') { process.exit(0)}const husky = (await import('husky')).defaultconsole.log(husky());แล้วก็มาแก้ script ใน package.json
pnpm pkg set \ 'scripts.prepare=node .husky/install.mjs'package.json
"scripts": { "lint": "eslint --fix .", "prepare": "node .husky/install.mjs", ... other scripts ... },ในไฟล์ .husky/pre-commit ก็ใส่คำสั่ง แบบนี้
pnpm env:all:ecnpm version patch --no-git-tag-versiongit add .หลังจาก git commit แล้ว husky ก็จะทำทำคำสั่งเหล่านี้
- ให้ encrypt env ทุกไฟล์ ก่อน push code
- update version ใน package.json
gitmoji and commitlint
pnpm i -D commitlint-config-gitmoji commitlintcommitlint คือ tool ที่ช่วยให้เราตั้งกฎของ commit message
ถ้าคนที่ commit code ใส่ message ไม่ตรงกับกฎ จะทำให้ commit ไม่ผ่าน
กฎที่ใช้ก็จะเป็นกฎของ gitmoji
สร้างไฟล์ commitlint.config.cjs
.├── app├── commitlint.config.cjs├── components.json├── Dockerfile├── eslint.config.js├── global.d.ts├── package.json├── pnpm-lock.yaml├── public├── react-router.config.ts├── README.md├── tailwind.config.ts├── tsconfig.json└── vite.config.tscommitlint.config.cjs
module.exports = { extends: ['gitmoji'], rules: { 'header-max-length': [0, 'always', 100], },};สร้างไฟล์ commit-msg ที่ folder .husky
เพื่อให้ husky ไปเช็คว่า commit message ตรงกับกฎหรือเปล่า
.husky├── commit-msg├── install.mjs└── pre-commit.husky/commit-msg
pnpm dlx commitlint --edit "$1"Commitizen
เนื่องจากว่าเราใช้ กฎของ gitmoji ที่ commit message
เพื่อที่จะให้ ทีมเขียน message ได้ตรงกฎ และทำได้ง่ายๆ เราก็จะใช้ Commitizen มาช่วย
เราจะทำ preset เอาไว้ล่วงหน้า เวลาจะ commit message ก็เรียก commitzen มาช่วยทำ มันจะมี selection มาให้เราใช้ ทำให้ใส่ commit message ได้ง่ายและตรงกับกฎ
pnpm add -D commitizen cz-customizableที่ package.json ก็เพิ่ม script กับ config หน่อย
pnpm pkg set scripts.commit=czpnpm pkg set config.commitizen.path="node_modules/cz-customizable"pnpm pkg set config.cz-customizable.config="./cz.config.cjs"จะได้ config แบบนี้ใน package.json
package.json
"config": { "commitizen": { "path": "node_modules/cz-customizable" }, "cz-customizable": { "config": "./cz.config.cjs" } }แล้วก็จะมาสร้าง preset ด้วยการใส่ไว้ในไฟล์ cz.config.cjs
preset นี้ผมก๊อปมาจาก Commitizen อีกทีนึง เพื่อนๆก็ลองปรับแก้กันได้นะ
cz.config.cjs
module.exports = { types: [ { value: ':sparkles: feat', name: '✨ feat:\tAdding a new feature' }, { value: ':bug: fix', name: '🐛 fix:\tFixing a bug' }, { value: ':memo: docs', name: '📝 docs:\tAdd or update documentation' }, { value: ':lipstick: style', name: '💄 style:\tAdd or update styles, ui or ux', }, { value: ':recycle: refactor', name: '♻️ refactor:\tCode change that neither fixes a bug nor adds a feature', }, { value: ':zap: perf', name: '⚡️ perf:\tCode change that improves performance', }, { value: ':white_check_mark: test', name: '✅ test:\tAdding tests cases', }, { value: ':truck: chore', name: '🚚 chore:\tChanges to the build process or auxiliary tools\n\t\tand libraries such as documentation generation', }, { value: ':rewind: revert', name: '⏪️ revert:\tRevert to a commit' }, { value: ':construction: wip', name: '🚧 wip:\tWork in progress' }, { value: ':construction_worker: build', name: '👷 build:\tAdd or update regards to build process', }, { value: ':green_heart: ci', name: '💚 ci:\tAdd or update regards to build process', }, ],
scopes: [ { name: 'api' }, { name: 'admin' }, { name: 'web' }, { name: "database" }, { name: "ci" }, { name: "cd" }, { name: "docker" }, { name: "general" }, ],
usePreparedCommit: false, // to re-use commit from ./.git/COMMIT_EDITMSG allowTicketNumber: false, isTicketNumberRequired: false, ticketNumberPrefix: 'TICKET-', ticketNumberRegExp: '\\d{1,5}',
// it needs to match the value for field type. Eg.: 'fix' /* scopeOverrides: { fix: [
{name: 'merge'}, {name: 'style'}, {name: 'e2eTest'}, {name: 'unitTest'} ] }, */ // override the messages, defaults are as follows messages: { type: "Select the type of change that you're committing:", scope: '\nDenote the SCOPE of this change (optional):', // used if allowCustomScopes is true customScope: 'Denote the SCOPE of this change:', subject: 'Write a SHORT, IMPERATIVE tense description of the change:\n', body: 'Provide a LONGER description of the change (optional). Use "|" to break new line:\n', breaking: 'List any BREAKING CHANGES (optional):\n', footer: 'List any ISSUES CLOSED by this change (optional). E.g.: #31, #34:\n', confirmCommit: 'Are you sure you want to proceed with the commit above?', },
allowCustomScopes: true, allowBreakingChanges: ['feat', 'fix'], // skip any questions you want // skipQuestions: ['scope', 'body'],
// limit subject length subjectLimit: 100, // breaklineChar: '|', // It is supported for fields body and footer. // footerPrefix : 'ISSUES CLOSED:' // askForBreakingChangeFirst : true, // default is false};lint-staged
lint-staged คือ
ปกติก่อนที่เราจะ commit code เราจะต้องลองให้ eslint มันช่วยเช็ค code ให้เราก่อนว่ามีอะไรผิดกฎของ eslint หรือเปล่า
ทำให้เพื่อนๆในทีมมั่นใจว่า code ที่ pushed ขึ้นมาผ่านกฏมาแล้ว มั่นใจได้ระดับนึงว่าน่าจะทำงานได้
แต่ถ้าเราแก้โค้ดแค่ไม่กี่ไฟล์ เราก็ไม่มีความจำเป็นต้องให้ eslint ไปเช็คไฟล์ที่ไม่ได้แก้ไข ให้เช็คเฉพาะไฟล์ที่เราแก้ก็พอ
lint-staged จะมาช่วยเราทำสิ่งนี้แหละ
pnpm add -D lint-stagedสร้างไฟล์ lint-staged.config.mjs
lint-staged.config.mjs
const config = { "*.{js,ts,jsx,tsx}": "eslint .",};
export default config;จากนั้นเราจะแก้คำสั่ง commit ใน script ใน package.json
pnpm pkg set 'scripts.commit=lint-staged && cz'Test to commit code
ทีนี้พอเราจะ commit code ก็ให้สั่ง
git add .ตามด้วย
pnpm commitแล้ว script ก็จะไปสั่ง lint-staged ถ้าผ่าน eslint มาได้ code เราก็น่าจะมี format ที่เป็นไปตามกฎใน eslint แล้ว
ก็จะมาต่อที่ cz จะเอา preset มาให้เราเลือก แบบนี้
> lint-staged && cz
✔ Backed up original state in git stash (95eb558)✔ Running tasks for staged files...✔ Applying modifications from tasks...✔ Cleaning up temporary files...
>>> Using cz-customizable config specified in your package.json: /Volumes/HadesGodBlue/Learn/react-router-v7/my-react-router-app/cz.config.cjsAll lines except first will be wrapped after 100 characters.? Select the type of change that you're committing: (Use arrowkeys)❯ ✨ feat: Adding a new feature 🐛 fix: Fixing a bug 📝 docs: Add or update documentation 💄 style: Add or update styles, ui or ux ♻️ refactor: Code change that neither fixes a bug nor adds afeature ⚡️ perf: Code change that improves performanceDenote the SCOPE of this change (optional): (Use arrow keys)❯ backend admin web database ci cd dockerDenote the SCOPE of this change (optional): web? Write a SHORT, IMPERATIVE tense description of the change: add eslint, gitmoji, lint-staged? Provide a LONGER description of the change (optional). Use "|"to break new line: false? List any ISSUES CLOSED by this change (optional). E.g.: #31,#34:
###--------------------------------------------------------###:sparkles: feat(web): add eslint, gitmoji, lint-staged###--------------------------------------------------------###
? Are you sure you want to proceed with the commit above? (Yneh)จากนั้น cz ก็จะสร้าง message แล้วเอาไปใส่ใน git commit ให้เราเอง
จากนั้น husky ก็จะทำงานไปเรียก .husky/commit-msg ให้ทำงาน มันก็จะไปเรียก commitlint มาตรวจสอบ commit message อีกทีนึง
ถ้าผ่านแล้วก็จะไปเรียก .husky/pre-commit ให้ทำงาน ก็จะไปไล่ encrypt .env ทั้งหลาย up version
ถ้าทุกอย่างเสร็จเราก็จะได้ commited code แล้ว
ในที่นี้ผมก็จะได้แบบนี้

Thank you 🙏🫰
ขอบคุณทุกคนที่อ่านมาถึงตรงนี้
ใน tutorial นี้ยังขาดการ setup Test ถ้าผมมีเวลาจะมาเขียนแยกเป็นอีก blog นึงละกันครับ นี่ก็เยอะมากเลย
ตัวอย่างโค้ดอยู่ใน github นะครับ this is github repo for this blog
ขอให้มีความสุขกับการ coding นะครับ